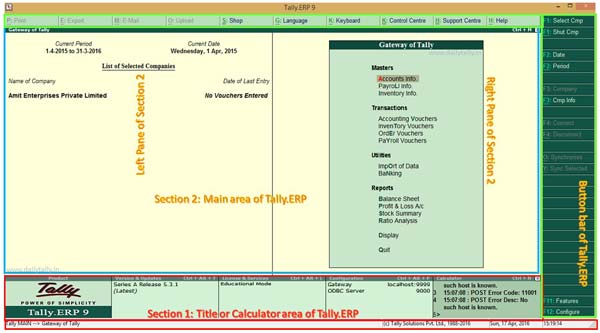
Tally.ERP is most of the popular accounting cum inventory software. The Gateway of Tally.ERP has different sections in his accounting package. Today we discuss about the top sections of Tally-ERP and describe all sections in this article.
Most of the person have little bit information about these section, but this article helps you to easily and deeply understand different things about these sections.
Must Read: How to Make Adjustments Entries of Final Account
Top sections of Tally-ERP:
When you start Tally.ERP software on your computer you will get top sections of Tally-ERP:
1. Title or Calculator area of Tally.ERP
2. Main area of Tally.ERP
3. Button bar of Tally.ERP
Title or Calculator area of Tally.ERP:
Title or calculator are is the first top sections of Tally-ERP. This area contains Tally.ERP product release, version & update status (Ctrl+Alt+T), licenses and services detail which shown type of your product either educational or professional, Gateway server, port, path and remote licenses detail (Ctrl+Alt+L), configuration detail shown General, ODBC, Gateway & Data configuration information (Ctrl+Alt+F) and also displays calculator area (Ctrl+N) which is used to do any kind of numeric calculation.
Must Read:
The title or calculator area of Tally.ERP also has Tally logo on extreme left side. This area also sown copyright name, year, current date in DD/MM/YYYY format along with time which is shown in HH:MM:SS format.
Main area of Tally.ERP:
Main area is the second top sections of Tally-ERP. The main area of Tally.ERP is divided into two panes: Left side and Right side. The left pane of main area Tally.ERP shown list of one or more selected companies, current date, current period of financial year, date of last entry. If you does not make any entry in active company then by default it shows “No Vouchers Entered”.
The right pane of Tally.ERP has four main sections in Gateway of Tally; Masters, Transactions, Utilities/ Import & Reports.
Masters in Tally.ERP:
Masters section in Tally.ERP by default has two separate option Accounts Info and Inventory Info. Accounts Info. is used to create, display, edit or delete any ledger, group, cost center, voucher types, budget, scenarios and currencies. Inventory Info is used to create, display, edit or delete any stock group, stock categories, stock items, units of measure (UOM), godowns, price list, voucher type and set or edit reorder level.
Note: If you turn on Payroll feature then you will also get “Payroll Info.” With the help of Payroll Info. you will be able to easily create, display, edit or delete employee groups, employee names, units of work, attendance/production types, pay heads, salary detail and voucher types in Tally.ERP.
Transactions in Tally.ERP:
The transactions parts in Tally.ERP is used to make or record day by day different transactions in different accounting and inventory vouchers. You can also record any transaction in payroll vouchers also.
Import/Utilities in Tally.ERP:
The import or utilities section in Tally.ERP is used to import different vouchers or masters in active company. You can also use different banking transaction in this section like cheque printing, cheque register, bank reconciliation, deposit slip, payment advice and post dated summary also.
Reports in Tally.ERP
Reports section in Tally.ERP is used to view, print, export of email different reports like balance sheet, profit & loss accounts, stock summary, ratio analysis and other reports.
Must Read: Ratio Analysis Meaning and Formula
Button bar of Tally.ERP:
Button bar is the third top sections of Tally-ERP. Button bar of Tally.ERP is located at the extreme right side and the top side of your Gateway of Tally. With the help of button bar you will be able to get quick access of different features or utlities of Tally.ERP. You can get quick access either by clicking the options with the help of mouse or you can also press function keys to quick run these commands.
F1: It is used to quickly select any company in Tally.ERP.
Alt+F1: It is used to quickly shut the active company in Tally.ERP.
F2: It is used to set or change the date in Tally.ERP.
Alt+F2: It is used to change the period of active company in Tally.ERP.
F3: It is used to open list of all active companies.
Alt+F3: It is used to open the company info. window in Tally.ERP.
F4: It is used to remote connect your active company.
Alt+F4: It is used to disconnect remote access of your active company.
F11: It is used to open the company features window in Tally.ERP.
F12: It is used to set or edit the configure settings of your Tally.ERP.
Alt+P: It is used for quick print any report in Tally.ERP.
Alt+E: It is used to quick export any report in Tally.ERP.
Alt+M: It is used to send the report via email to others in Tally.ERP.
Alt+O: It is used to upload your active company data on the server.
Ctrl+S: It is used to get different online services.
Alt+G: It is used to change or convert the data into other language.
Alt+K: It is used to change keyboard settings into different language.
Ctrl+K: It is used to login as a remote Tally.Net user after entering email id and password.
Ctrl+H: It is used to provide online support for login as a remote Tally.Net user.
Alt+H: It is used to provide online help facility on any features on Tally.ERP.
Note: If you have professional version with internet facility on your Tally.ERP then you will get the benefit of all these features. If you running on the educational version then you will not able to get the benefit of all these features in Tally.ERP.
Must Read: How to set or print mailing name in Tally ERP
I hope this article helps you to proper understand the top sections of Tally-ERP. If you have any suggestion regarding this article then write us in the comment box. Thanks to all.

Very Usefull...
please post a sections of invoice in tally…