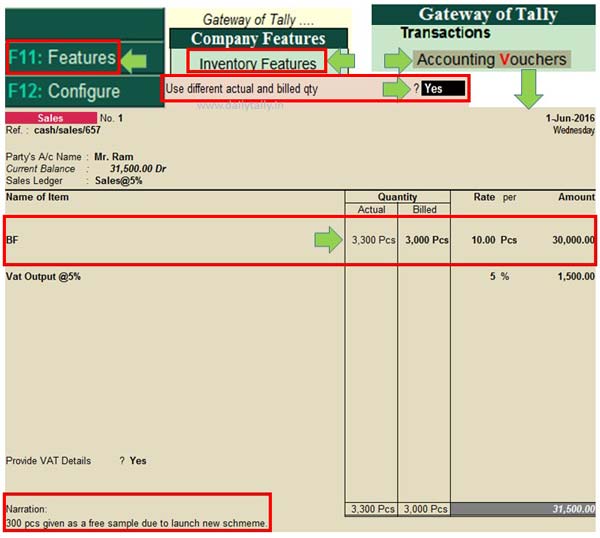
The different actual and billed quantity in Tally ERP play an important role during day to day accounting and maintain inventory register properly. Sometime if you give free sample of same stock item to your customers, give extra pics for replace the damaged goods against previous order etc. In that situation you need to use different actual and billed quantity in Tally ERP.
There are many reasons to use use different actual and billed quantity in Tally ERP. You have to give free sample of same stock item which you sold to your customer due to any scheme. Sometime you have must have to exchange damaged goods which you given earlier to your customer. In that situation you have to give free stock items quantity and there is no need to charge the amount from customers.
Must Read: How to Make Adjustments Entries of Final Account
This option is differ from allow zero value entry in Tally ERP. You have to use different stock item for free sample or exchange damaged goods in allow zero value entry feature in Tally ERP. While you have to use same stock item as a free sample to increase the sales volume in your business or exchange the damaged goods with the help of different actual and billed quantity feature in Tally ERP.
Steps to use different actual and billed quantity in Tally ERP
If you want to apply any scheme to increase the monthly sales achievements or exchange any damaged goods to your customers then you have to use this feature in Tally ERP.
Step 1: Open an existing company in which you want to use to give free sample of same stock item to your customers. You can also create necessary ledger or stock items in new company to use this feature.
Step 2: Press F11 or click “Features” option from button bar. Press F2 or click on the “Inventory Features” option in Company Features window.
Step 3: Turn on “Use different actual and billed qty” – Yes. Now save this features either pressing enter key or you can also press Ctrl+A for quick save.
Step 4: Now make an entry in “Sales Voucher” by using this given path. GOT > Accounting Vouchers > Press F8 or click on the “Sales” voucher. Now when you active sales voucher you will see there are two vertical columns shown for quantity with the name of “Actual” and “Billed” at your screen.
After saving this entry you have to take print out of the invoice by pressing Alt+P or you can also direct send invoice via email to your party by pressing Alt+M (for E-Mail).
Must Read: Maintain bill wise detail for receivable and payable in Tally
I hope after reading how to use different actual and billed quantity in Tally ERP article your problem is resolved. If you have any suggestion and query regarding this article then write us in the comment box. Thanks to all.

ASHIS
HOW CAN I SEE DIFFERENT COLUMN IN REPORT MODE ?